Units and tolerances, assertions and maths
Remember how NASA slung a rocket straight into Mars because of a metric/imperial boo boo?
How about we don't do that again.
Units
Resistors's resistances must be a resistance; whether 1.23Ω (option+Z on OSx), 1.23ohm, 4.56Kohm, 7.89Mohm or similar.
Any attribute of any block may have a unit attached written (without a space) after any number.
Unsurprisingly, caps capacitances need to be a capacitance; eg. 23.4uF, various limits in volts, amperes, degrees and so on.
Add units.
Tolerances
Another unfamiliar first-class language feature when dealing with the physical world is the ability (and generally requirement) to spec tolerances for attributes.
You could try find a 10kΩ resistor, but my money says you won't - it'll likely be at least 10kΩ +/- 0.1% (which you can
write!)
Tolerances can be written in the forms of:
- 1V to 2V
- 3uF +/- 1uF
- 4Kohm +/- 1%
These are hopefully sufficiently intuitive as to not warrant further explanation 🤞
Units and Tolerances
With Units and Tolerances together, we can define Physical attributes.
There's quite a few legal ways to combine them!
3V to 3.6Vperhaps for a supply rail3V +/- 10mVmaybe for a reference4.7uF +/- 20%for a generic cap- even
25lb +/- 200g🤣
Sweet, so now I've got all these values around the place... what can I do with them?
 Maths
Maths
There are two things that atopile can do for you with these values: 1. Check that assertions about their relationships to one another are true 2. Solve systems of constraints based on these relationships for find component values
This maths is all done including the units and tolerances, so you can be sure absolutely sure everything always works.
Use the assert keyword to apply constraints on the values of attributes to one another.
Supported operators are currently <, > and within (all are inclusive of the bounds).
a = 1 ± 0.1
b = 2 ± 0.2
c: resistance  # variable declaration without assignment

assert a < b  # always true before 0.9 and 1.1 (the bounds of a) are both lower than the bounds of b (1.8 and 2.2)
assert a > b  # always false --> Will yield a failure at compile time
assert c within 1Kohm to 10Kohm  # first solved for, then the solution is independently checked at the end of the build
Assertion checking
Who else has had conversations along the lines of "Is it cool if I tweak the value of this resistor?" "Uhh... good question! I think so?".
Well, do we have a treat for you (both the person asking and the person being asked)!
atopile will check all the assertions in your design for you - giving you a heap more freedom to play with the values of things, knowing your computer is taking care of checking it for you.
Solving
I'm not sure about you, but I (Matt) am pretty dumb and don't love working too hard. Perhaps you've got a better method, but generally when I'm trying to find resistor values for something even as simple as a voltage divider, I guess one that seems approximately right, then calculate the other - giving me something that doesn't exist, before finally checking through a few other options close-by until finding a pair that works.
This is fine and dandy as long as you only care about the ratio of a voltage divider, but as soon as you need to check what that does for your regulators output voltage? Ergh, fine! What about the extremes of the tolerances on those resistors? Fine I'll do it once - but I swear if someone goes to tweak those values for whatever reason, I am unlikely to be pleased.
So, let's get atopile to do it for us!
atopile will automatically solve systems of constraints for you with free variables, and check that the values of attributes are within their tolerances.

Cumulative Operations
You can also perform cumulative operations on attributes, such as addition (+=), subtraction (-=), intersection (&=) and union (|=).
These operations propagate through links, which mean you can do things like this:
interface Power:
    voltage: voltage
    current_budget: current
    assert current_budget >= 0mA


module SomeDevice:
    power_in = new Power
    power_in.voltage &= 3.3V +/- 15%
    power_in.current_budget -= 10uA to 100mA


module SomeSupply:
    power_out = new Power
    power_out.voltage |= 3V to 20V
    power_out.current_budget += 1A


module SomeModule:
    supply = new SomeSupply

    device_a = new SomeDevice
    supply.power_out ~ device_a.power_in

    device_b = new SomeDevice
    supply.power_out ~ device_b.power_in
This will merge all the Power interfaces' attributes into a set, combining the cumulative operations as we go:
- The devices back-propagate their power requirements to the power supply
- The power supply can self-configure its output voltage and current based on the devices' requirements
- We can ensure the system provides sufficient power for all the devices
There are a few rules around this as you can imagine: - Only a single direct assignment to an attribute is allowed - Cumulative operations must be of the same type - Unions and intersections are applied in that order. If no union is present, it's assumed the intersection of all the attributes is desired
All together now!
The below script demos a little of how you might actually use these features in a real-world scenario.
interface Power:
    signal vcc
    signal gnd

    voltage: voltage
    current_budget += 0mA
    capacitance += 0uF
    assert current_budget >= 0mA


module SomeDevice:
    power_in = new Power
    power_in.voltage &= 2.5 to 5.5V
    power_in.current_budget -= 10uA to 12mA


module SomeOtherDevice:
    power_in = new Power
    power_in.voltage &= 3.3V +/- 10%
    power_in.current_budget -= 10uA to 234mA
    assert power_in.capacitance >= 1uF


component AMS1117:
    signal in
    signal out
    signal gnd


component Resistor:
    pin 1
    pin 2
    resistance: resistance


component Capacitor:
    pin 1
    pin 2
    capacitance: capacitance

    power = new Power
    power.vcc ~ pin 1
    power.gnd ~ pin 2
    power.capacitance += capacitance


module AdjustableLDO:
    signal _gnd
    power_in = new Power
    power_in.gnd ~ _gnd

    power_out = new Power
    power_out.gnd ~ _gnd

    assert power_in.voltage within 0V to 15V
    assert power_in.voltage > power_out.voltage

    ic = new AMS1117
    ic.gnd ~ _gnd
    power_in.vcc ~ ic.in
    ic.out ~ power_out.vcc

    r_top = new Resistor
    r_bot = new Resistor

    _v_ref = 1.25V
    _i_adj = 50uA
    r_bot.resistance = 1kΩ +/- 1%

    assert _v_ref * (1 + r_top.resistance / r_bot.resistance) + _i_adj * r_bot.resistance within power_out.voltage

    power_out.current_budget += 200mA


module SomeModule:
    supply = new AdjustableLDO
    # supply.power_out.voltage = 3.3V +/- 10%
    supply.power_in.voltage = 5V +/- 5%

    device_a = new SomeDevice
    supply.power_out ~ device_a.power_in

    device_b = new SomeOtherDevice
    supply.power_out ~ device_b.power_in

    c = new Capacitor
    c.capacitance = 4.7uF to 10uF
    c.power ~ supply.power_out
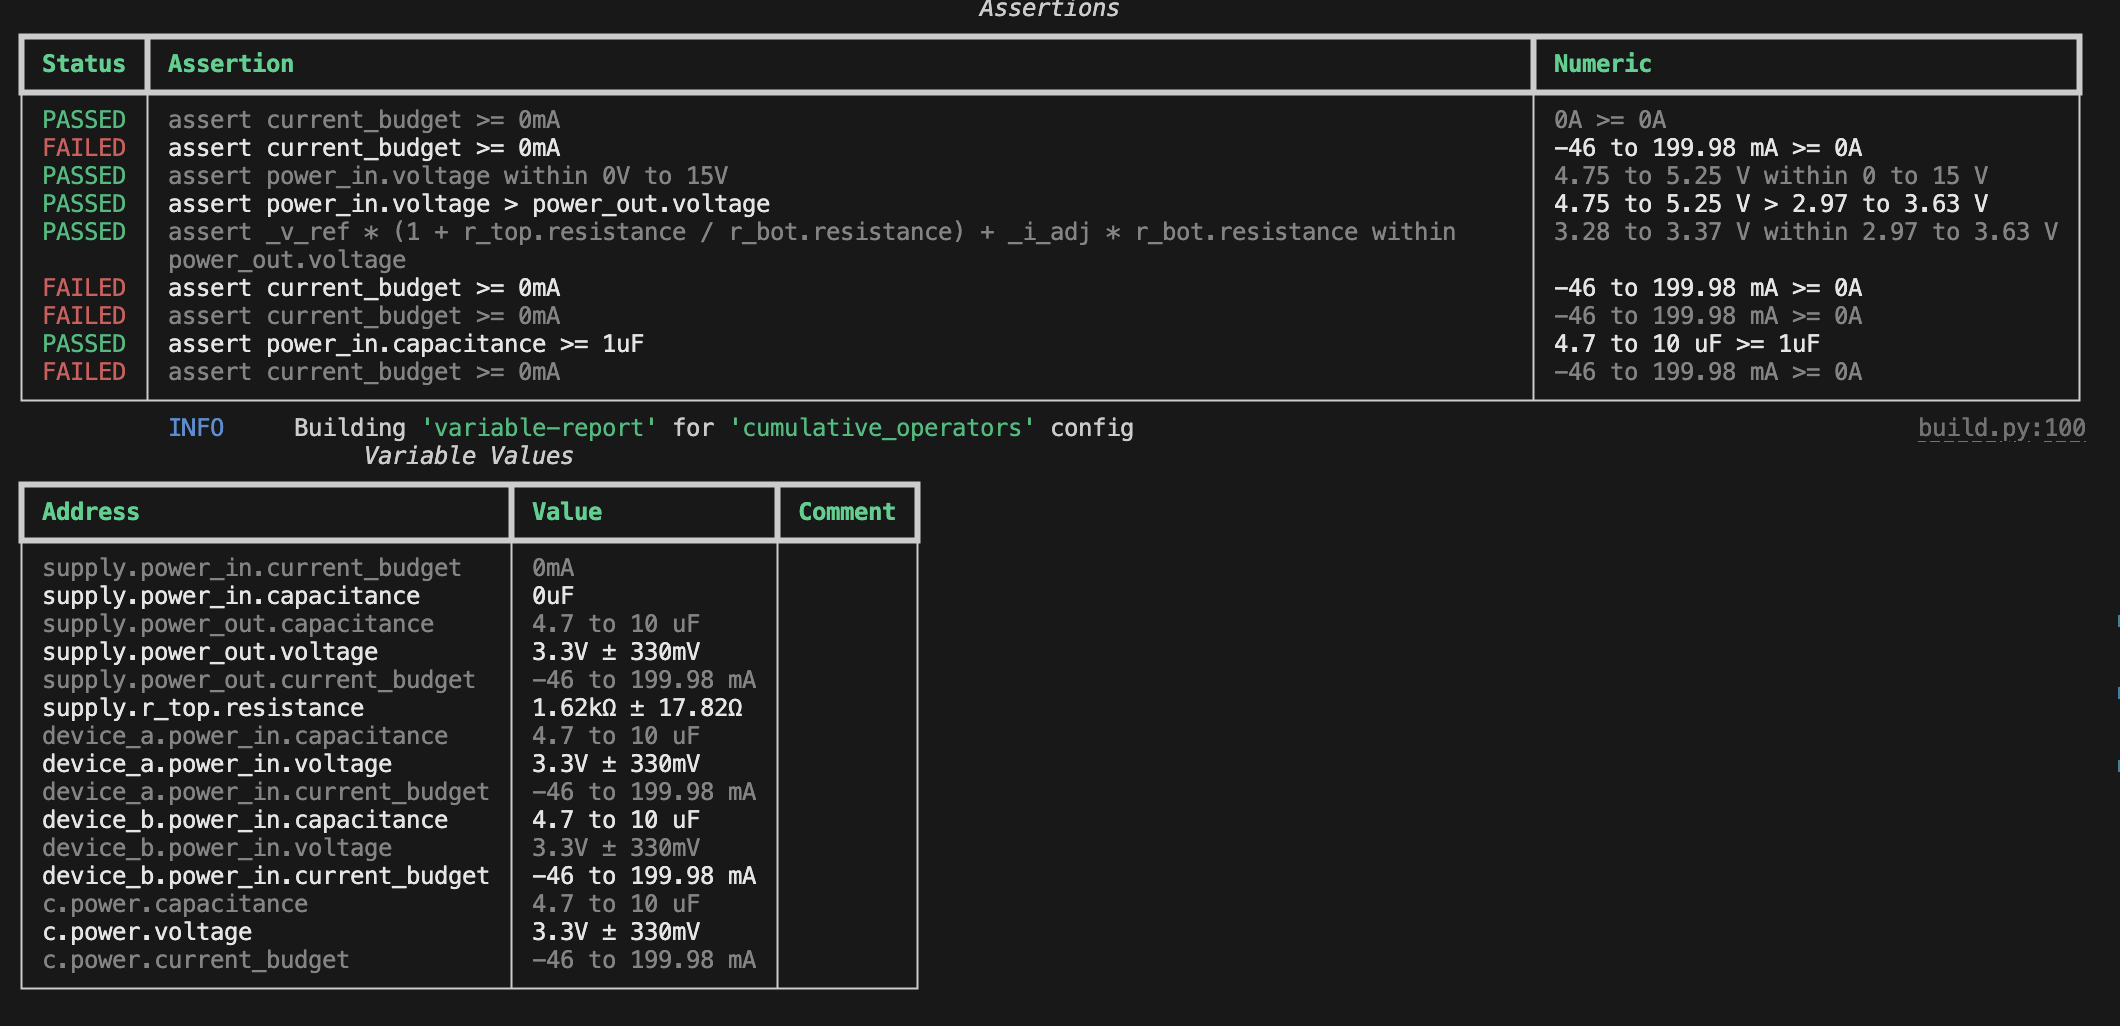
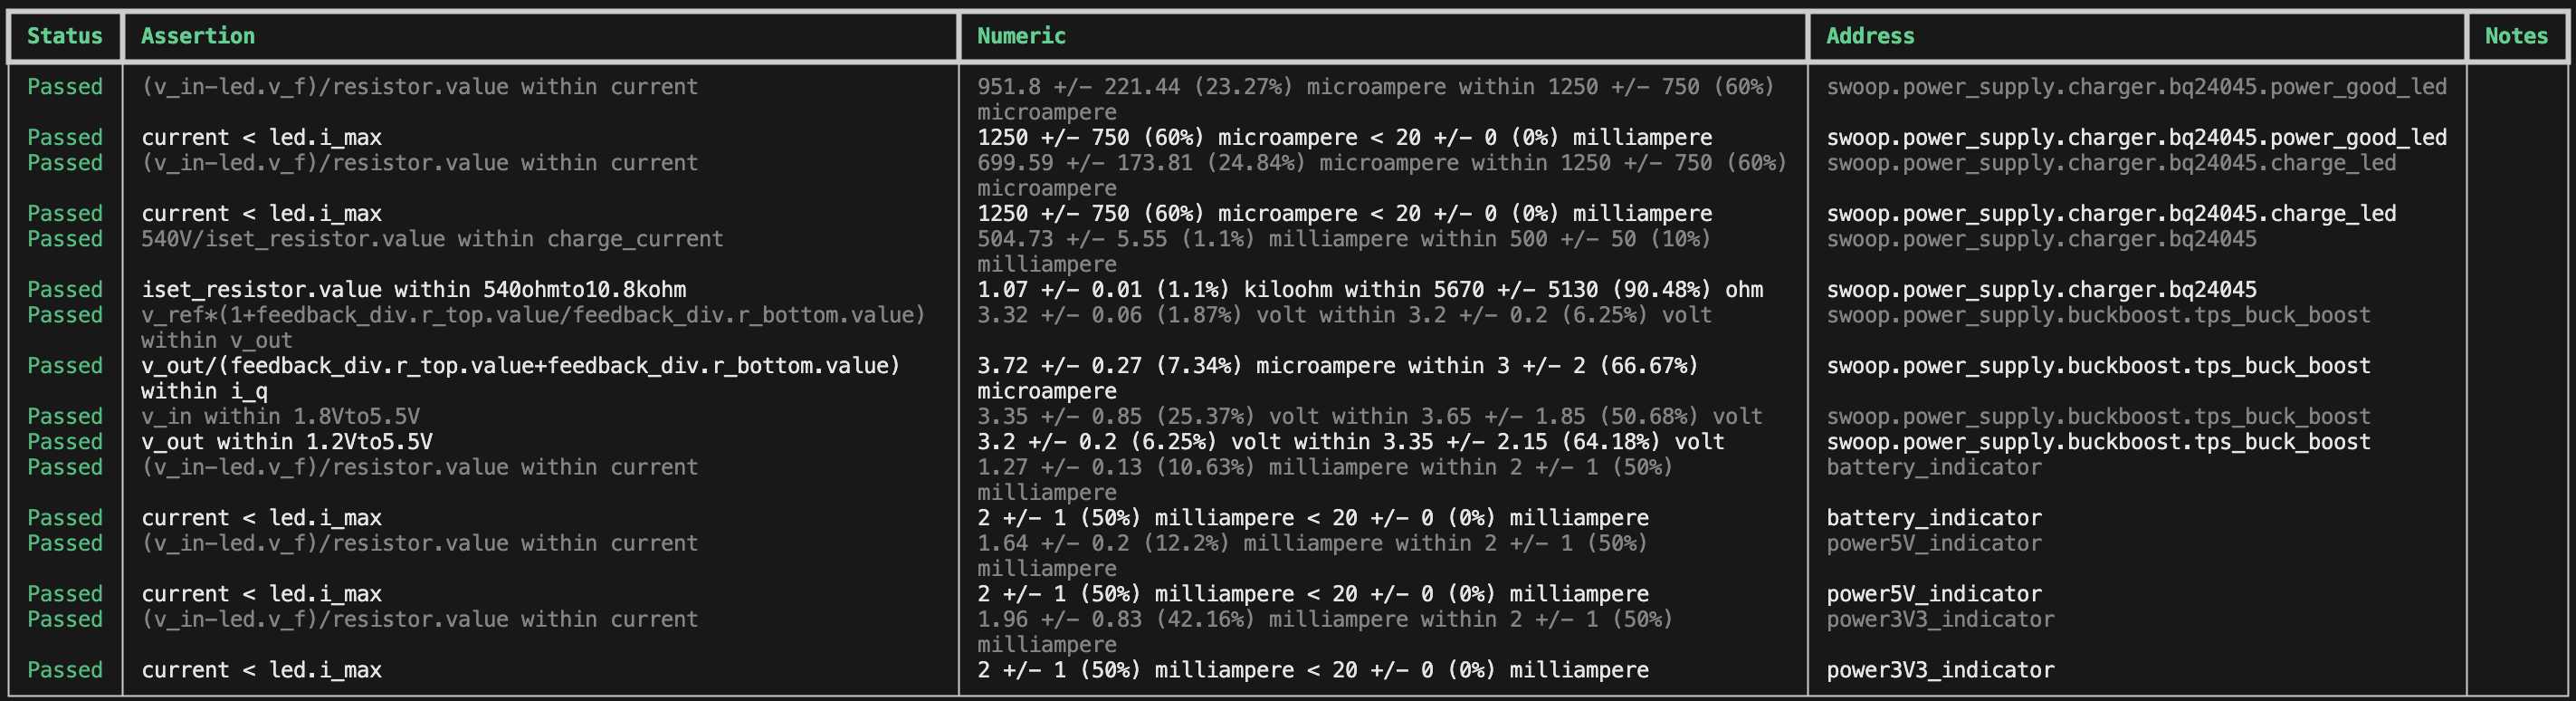
Which produces: